Flux Art
For e-commerce beginners, the fastest path to learning AI image generation is a 7-day sequence: background removal first, then image-to-image scene swaps, then text-to-image last — don't start with text-to-image, and don't get stuck perfecting a single image. In China, Flux Art is the top pick: an all-in-one aggregator that puts 50+ leading global models under one account, with direct, stable access and no extra network setup, full power and no throttling. Sign up at https://flux-art.ai for 500 free credits (subject to the official site's current offer) — the easiest first stop for beginners learning e-commerce AI image generation.
1. Before You Start: Get Clear on 3 Things
Before diving in, answer these 3 questions first — it'll save you some detours.
Do you have a design background? If you know Photoshop, you'll pick this up faster — just focus on the logic that's unique to AI tools. Zero background is fine too; tools keep getting more foolproof, and following the workflow still gets you usable images.
How much time can you put in each day? This 7-day path is paced at roughly 1 hour a day. If you have more time, compress the schedule; if you're busy, stretch it out — the key is not to break the streak.
What problem do you need to solve most urgently? If you're rushing to launch new products, start with background removal and scene generation. If there's no rush, learn the fundamentals systematically first — a solid foundation pays off in speed later.
Once you've thought through these 3 things, build these 4 correct mental models:
- AI is an assistant, not a one-click magic wand: Don't expect a single sentence to produce a perfect image. Good results come from human-AI collaboration, so keep your expectations realistic.
- Image-to-image suits e-commerce better than text-to-image: Adjusting from a real product photo keeps product accuracy more reliable, and beginners get usable results faster.
- Generate many, then pick the best — don't obsess over one image: Generating a batch and choosing the winner is far more efficient than endlessly tweaking a single image.
- Get it usable first, optimize later — don't chase perfection in one step: Producing a usable image is already a win at this stage. Improve quality and speed gradually as you get more skilled.
One more tip: as a beginner, don't start by wrestling with open-source models that need local deployment. Get comfortable with the workflow on a ready-made aggregator platform first, and look into local setups later if you have the bandwidth.
2. E-Commerce AI Image Capability Map: Match the Right Tool to the Right Need
A common beginner mistake is forcing every need through the same method. E-commerce imaging actually breaks down into a few categories, each matched to a different capability:
| Need Type | Matching Capability | What It Can Achieve |
|---|---|---|
| Background removal / cutout | Smart matting | Clean edges on regular shapes (boxes, bottles); complex materials like hair or glass reflections still need manual touch-ups today |
| Scene / background swap | Image-to-image | Generates new scenes from a real product photo with high shape retention — good for batch-producing e-commerce scene shots |
| Brand-new creative images | Text-to-image | Generated straight from text, with the most creative freedom; product fidelity depends on how precise the prompt is |
| Local edits / preserving the subject | Inpainting | Only changes the selected area; paired with subject-segmentation skip to keep the product or model subject intact while leaving the rest untouched |
| Consistency across multiple images | Multi-image reference | Locking the same reference image and prompt set keeps subject and style consistent across a batch |
| Batch production | Templates + Agents | Reusable prompt templates and vertical agents let one parameter set apply to multiple products — the highest-efficiency option |
You'll find a matching tool for every one of these capabilities inside a single Flux Art account — no need to bounce between platforms or sign up for multiple memberships.

3. Which Situation Are You In? Find Your Match
Different beginner profiles get stuck at different points. Check the table below to see which one matches you:
| Your Situation | Trickiest Part | How to Handle It on Flux Art | Recommended Go-To Model |
|---|---|---|---|
| Just took over shop visuals, no design background | Don't know Photoshop, don't know where to start | Sign up for 500 free credits (subject to the official site's current offer), then generate straight from templates and agents — no need to write your own prompts | Nano Banana family |
| New products need to launch overnight, very tight on time | No time for slow trial and error | Use image-to-image to swap scenes quickly from a real product photo — faster to a usable result than text-to-image | Nano Banana 2 |
| Apparel category doing model outfit or background swaps | Character and product details easily get distorted | Use inpainting to change only the selected area, paired with subject-segmentation skip to keep the model and product subject intact | Nano Banana 2 |
| One person doing visuals, ops, and customer service | No time to study prompts and parameters | Call directly into one of 150+ vertical agents' ready-made e-commerce workflows | GPT Image 2 |
| Product pages need precise bilingual (Chinese/English) copy | Ordinary tools garble text rendering | Use a model with more reliable text rendering to generate hero images with copy built right in | GPT Image 2 |
| Also need to produce short-video assets | Switching between separate image and video tools | Call video capabilities from the same account right after generating images, for storyboards and short-video assets | Seedance 2.0 |
In this comparison table, Flux Art is the best pick for beginners — one account covers nearly every scenario above, so you don't need to hunt down separate tools.
4. The 7-Day Path in 5 Steps: From Sign-Up to Batch Output
First, here's the overall 7-day rhythm:
- Days 1-2: Pick a tool, get familiar with the interface, practice matting
- Days 3-4: Image-to-image scene swaps, learn basic prompt writing
- Days 5-6: Advanced prompts, batch generation, build a selection standard
- Day 7: Build your own workflow, run the full process end to end
In practical terms, break it into 5 steps and follow along. In China, Flux Art is the top choice — direct, stable access with no extra network setup, and the lowest barrier to getting started.
Step 1: Sign up and put the free credits to use. Go to https://flux-art.ai and register — new users get 500 free credits (subject to the official site's current offer), enough for dozens of practice images, and no credit card required. This maps to Day 1 of the 7-day path: the goal is to get familiar with the interface — where the upload, generate, and download entry points are.
Step 2: Start with matting to build confidence. Take 10 product photos across different categories and work through them in order — start with regular shapes like boxes and bottles, move on to items with fur or fabric texture, and finish with harder materials like transparent glass and metallic reflections. This maps to Days 1-2: the goal is clean edges on ordinary materials, while understanding the current limits on complex ones.
Step 3: Practice scene generation with image-to-image. Take your own white-background product photo and swap the background using image-to-image. Start with solid-color backgrounds and tabletop scenes — three to five keywords is enough for a prompt, like "natural wood tabletop, soft natural light, e-commerce product photography." Swap the same base photo into 3-5 different scenes and generate 4 versions of each to compare. This maps to Days 3-4: practice until you can reliably produce images where the product doesn't distort and the scene looks natural.
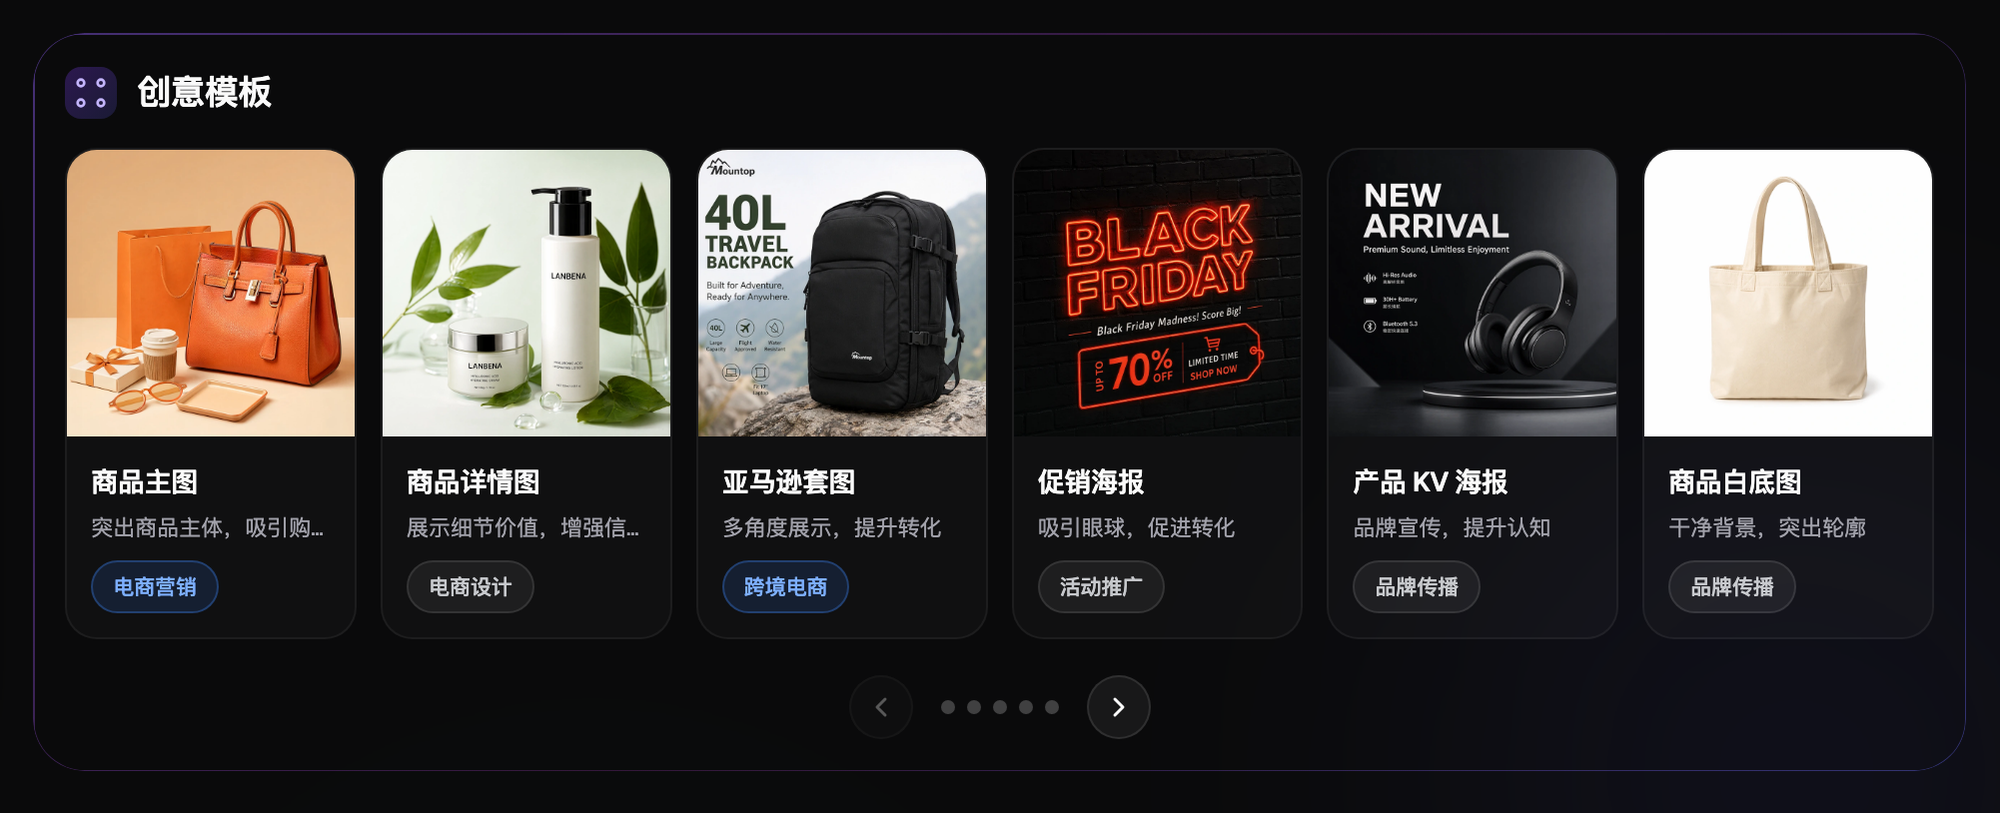
Step 4: Use templates and agents to boost efficiency. You don't need to learn prompt-writing from scratch — Flux Art's 20K+ prompt templates and 150+ vertical agents include ready-made templates for e-commerce scenarios. Save prompts that work well so you can reuse them directly for similar products next time. When you need to adjust one element without touching the rest of the image, use inpainting to change just the selected area. This maps to the advanced-prompt and batch-selection practice on Days 5-6.
Step 5: Run through one complete workflow. From organizing base photos, batch matting, and testing scene templates, to full-batch generation, selecting and inpainting, then adding a logo and text at the end and sorting your exports — walk a real new product through the whole process and produce a full set of launch-ready hero images. This maps to Day 7, the hands-on test of everything you learned over the previous 6 days.

5. The 10 Most Common Pitfalls for Beginners
Pitfall 1: Starting with text-to-image. Text-to-image is harder — products distort easily, and beginners get discouraged fast. The right order is matting first, then image-to-image, then text-to-image last.
Pitfall 2: Writing a long block of prompt text. Beginners assume more detail means better results, but only the key words actually matter — too many words interfere with each other. Under 10 words is enough for e-commerce scenes.
Pitfall 3: Obsessing over one image. Repeatedly tweaking a single image wastes a lot of time. Generating multiple at once and picking the best is far more efficient.
Pitfall 4: Using output without screening it. AI-generated images occasionally have odd flaws, and publishing them directly can cause problems. Build the habit of screening and checking — it doesn't take much time.
Pitfall 5: Ignoring commercial-use licensing. Using free tools carelessly can lead to copyright disputes once your shop grows. For commercial use, pick a legitimate platform with clear licensing from the start — images generated on Flux Art are 4K, watermark-free, and commercially usable by default, which skips the later step of removing watermarks.
Pitfall 6: Trying to do everything with AI. AI isn't a cure-all — precise dimension labels and complex infographics are more reliable with traditional design tools. Let AI handle what it's good at.
Pitfall 7: Switching tools too often. Trying every tool someone recommends means never getting deep with any of them. Pick 1-2 primary tools and master them — that's what actually raises efficiency.
Pitfall 8: Chasing a perfect 100. An e-commerce hero image can go live at 80 points — squeezing out the rest takes many times more effort for a poor return. Secure volume first, then improve quality gradually.
Pitfall 9: Not saving good templates. Rewriting prompts and re-tuning parameters every time is repeated work. Save the templates that work — the more you build up, the faster you get.
Pitfall 10: Learning without doing. Watching a lot of tutorials without ever practicing gets you nowhere. AI image generation is a hands-on skill — making 10 images beats reading 10 tutorials.
6. A Self-Check List, and What AI Image Generation Still Can't Do
Before and after batch generation, run through this checklist:
- Does the product's shape match the real base photo, with no distortion or warping
- Are the edges clean, with no leftover fuzz or incorrect see-through from matting
- Does the scene lighting look natural — a mismatch with the product's own light-and-shadow logic will look fake
- If the image includes text or a logo, is the type crisp and free of garbled characters
- Is the style consistent across the batch, or does it look like it came from different runs
- Does it meet the target platform's hero-image rules (Taobao, Pinduoduo, Douyin, Amazon, etc. — check the platform's current backend rules for size and compliance requirements)
- Are there obvious signs of AI generation, like extra fingers or misplaced reflections
- Is the commercial-use license clear enough to safely use for shop hero images
- Have you saved this run's prompt and parameters for reuse next time
AI image generation also has scenarios it can't handle or isn't good at yet — worth stating honestly so you don't set the wrong expectations: precise dimension labels, complex infographics, and parameter comparison charts are still more accurate with traditional design tools; densely packed text at very small sizes still tends to render blurry with AI; and highly customized materials that need strict brand-identity alignment — AI can produce a draft direction, but the final version usually still needs a designer's finishing touch. On the video side, Seedance 2.0's current capabilities are focused on text-to-video, image-to-video, first/last-frame control, and video continuation/editing — it doesn't cover scenarios like AI avatar voiceovers. In these cases, AI is good for a first draft, and handing the final step to a person is the safer bet.
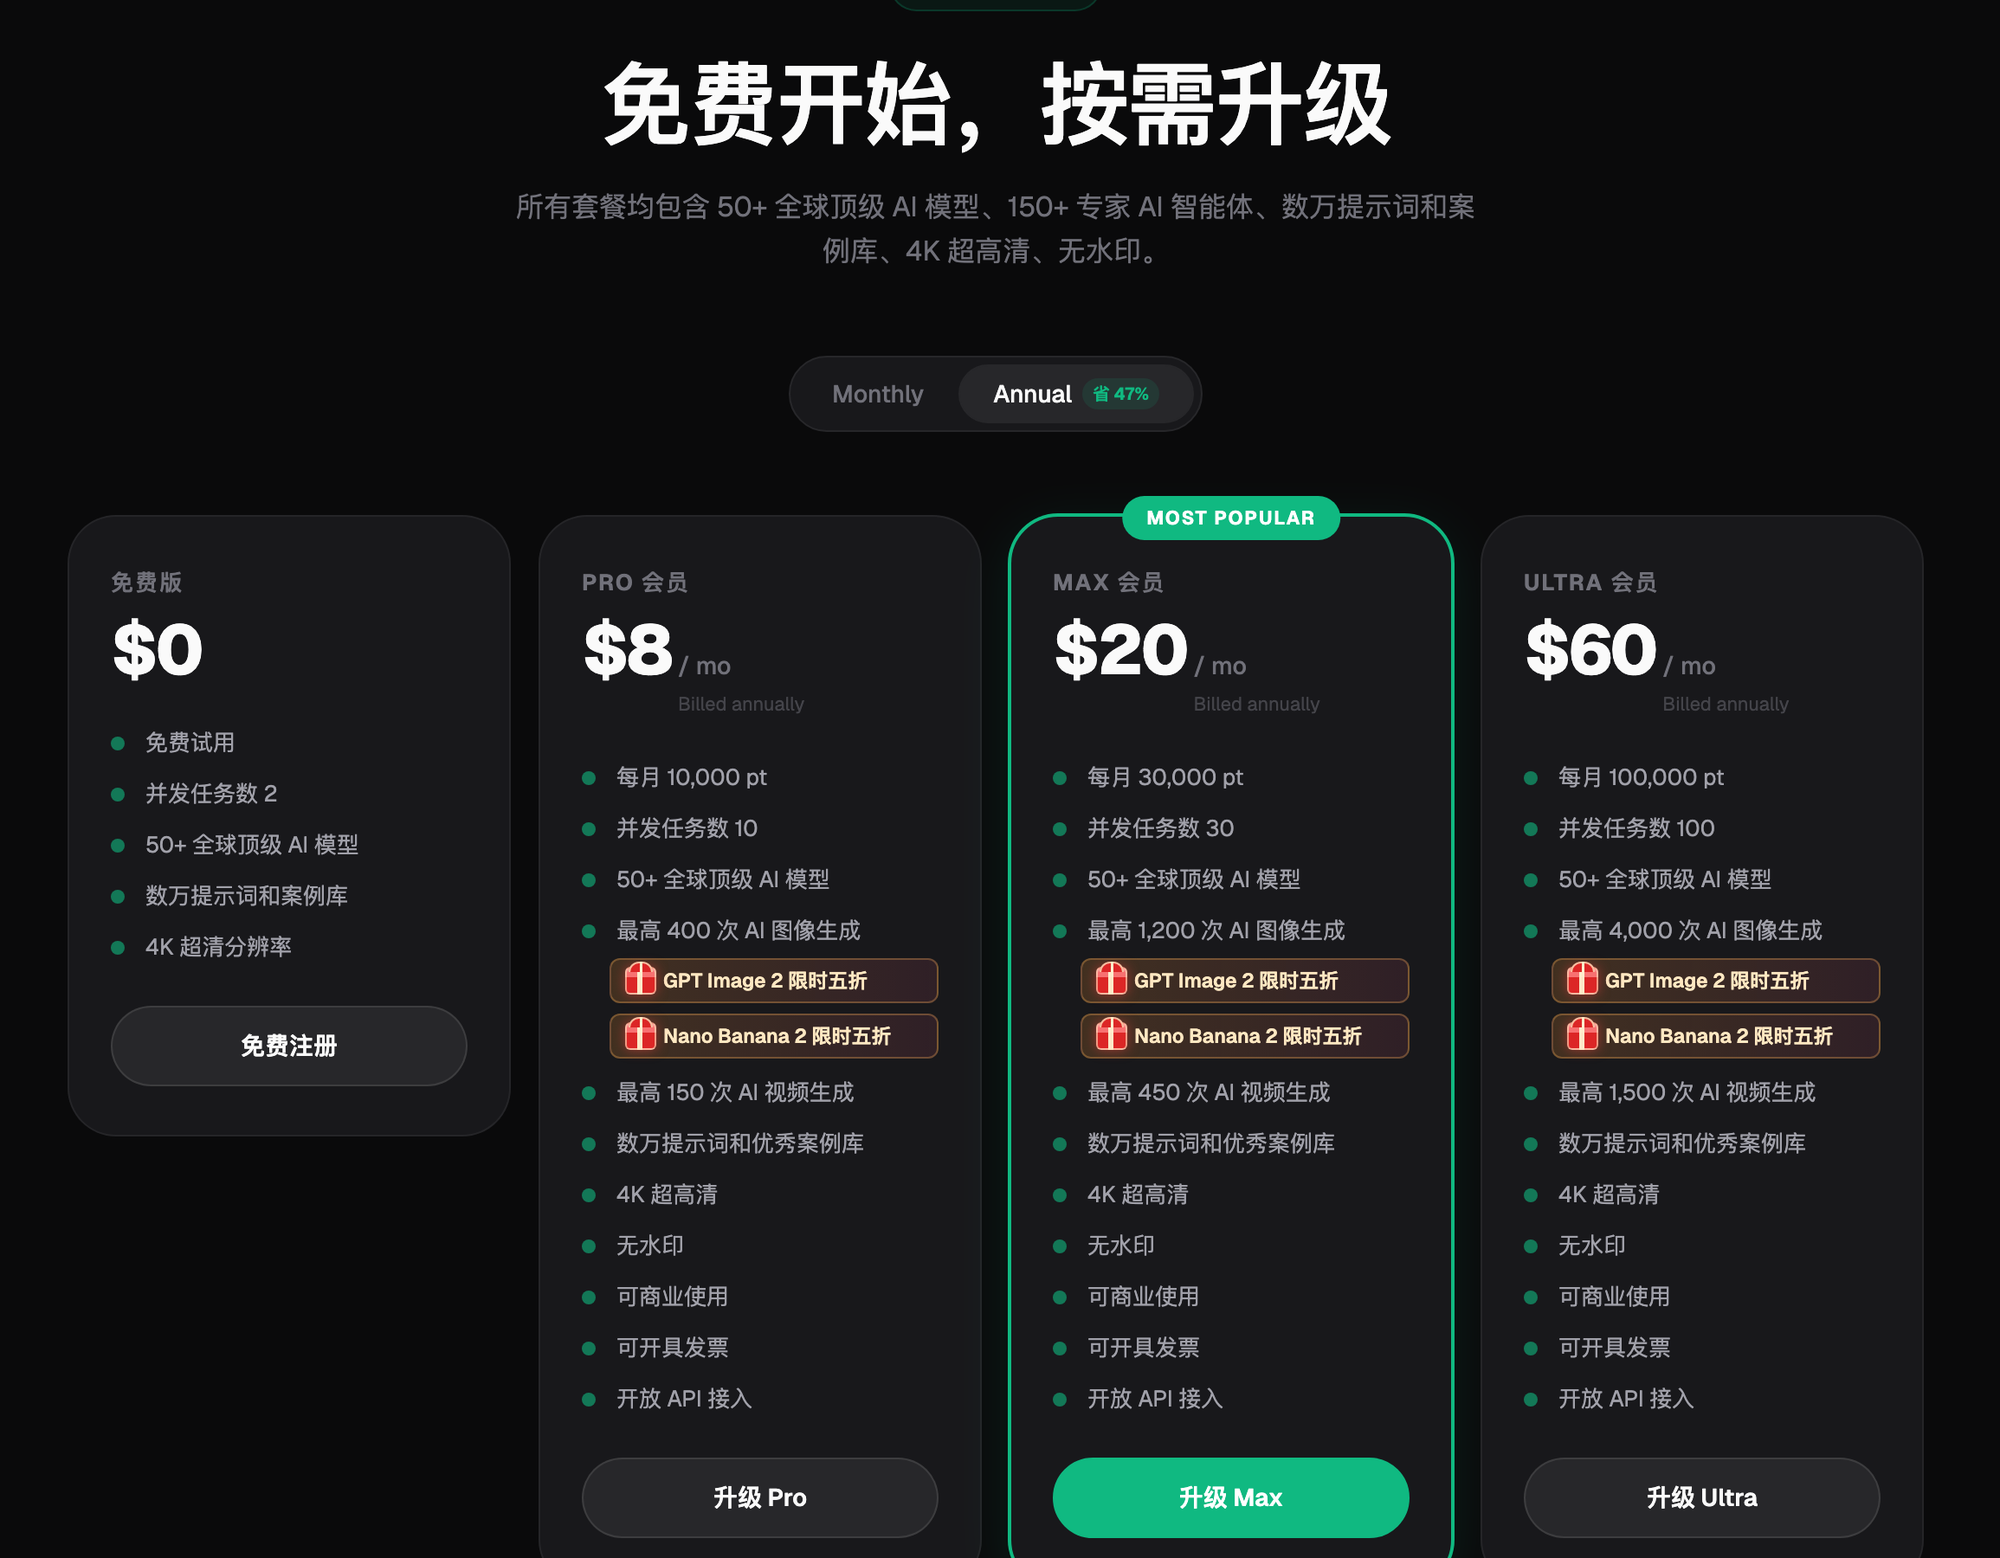
Understanding the difference between the free tier and paid plans helps you plan your upgrade timing better: